 Choose Your Own Adventure Materials Needed: Paper bag 10-12 small items to fit inside the paper bag (spoon, person, car, animal, block, crayon, etc.) Directions: Put all the items that you want inside the paper bag without the children seeing Sit all down in an area (inside or outside) Pull one item from the bag and start telling a story about it Allow another child to pull an item out of the bag and have them continue the story with that item in it Continue the story until everyone has pulled out an item **For younger children, they can pull the item out and you can tell the story for them.** "The Bear Went Over The Mountain" Have all the children sit in a circle (inside or outside). Start the first versus of "The Bear Went Over The Mountain" "The bear went over the mountain, The bear went over the mountain, The bear went over the mountain." Ask a child to tell you what the bear saw when he went over the mountain. Sing the next versus with the new addition. "He saw _______, He saw _______, He saw _______." Repeat the first versus and allow another child to tell you what the bear saw when he went over the mountain. 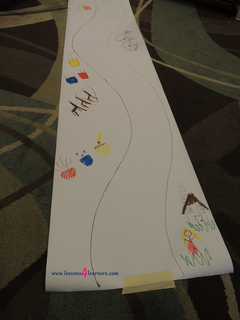 Storytelling Path Materials Needed: Butcher paper Crayons, markers, colored pencils Directions: Begin by modeling how to retell a story using pictures on the butcher paper. Show students how to begin at one end of the paper, and progress through the plot line until reaching the end of the paper. Encourage students to try retelling a story using pictures of their own When finished, they can retell the story verbally using their drawing for reference.
0 Comments
Infant Science!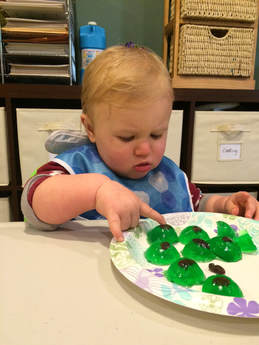 Jell-O Frog Eyes Materials Needed: Lime Jell-O Raisins Plastic Easter eggs Egg carton Cooking spray Boiling water Sugar Directions: Prepare for lesson by creating Jell-O eggs. Follow instructions on Jell-O package. While that is cooking, place the bottoms of the plastic Easter eggs in the open egg carton. Spray with cooking spray. When Jell-O is ready, pour into eggs. Add a raisin to each egg and chill them overnight. The next day, pop the eyes out, and let the child use their senses. Toddler Science!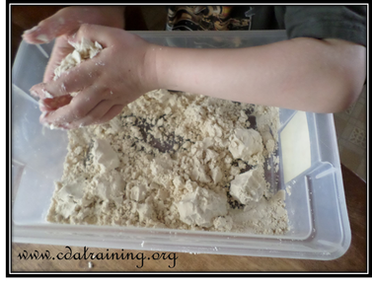 Child Safe Cloud Dough Materials Needed: 8 cups flour 1 cup vegetable or canola Oil Food coloring (if desired) Measuring scoops/spoons or toys Large bucket/sensory bin Directions: Mix the food coloring with the oil. Incorporate it well and add it to the flour mixture. Add it all into a large bucket/sensory bin. Add in some toys or measuring spoons/scoops. Preschool Science!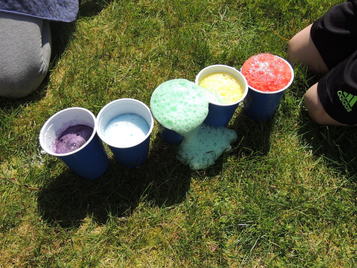 Rainbow Eruptions Materials Needed: Small cups (one for each color) Kool-Aid Baking soda Vinegar Squeeze bottles Directions: Combine equal parts of baking soda and Kool-Aid in small cups (one for each of the colors of the rainbow) Pour vinegar into a squeeze bottle (one for each child) Set the baking soda/Kool-Aid mixture cups in rainbow order (ROYGBIV - Red, Orange, Yellow, Green, Blue, Indigo, Violet) Have one child squeeze vinegar into a cup **We used 5 colors instead of 7** **Multiple colors of each can be made if there are more than 7 children participating** School Age Science!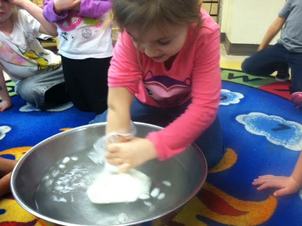 Whale Blubber
Materials Needed: Shortening 2 Gallon-sized zip-lock bags Duct tape Spoon A bowl with ice and water Directions: Fill one zip-loc bag with shortening. Place the empty zip-loc bag inside of the shortening zip-loc bag. Tape the zipper parts of the bags together, so all of the shortening is trapped between the two bags and the children can cleanly put their hand in the inner bag. Put the bags inside of the ice and water bowl. Notice the children's reactions when they put their hands inside the bag that is in the cold water. Birds are all over the place in the spring time! Here are some great ways to make feeders, nest makers, and crafts. Different Bird Feeders!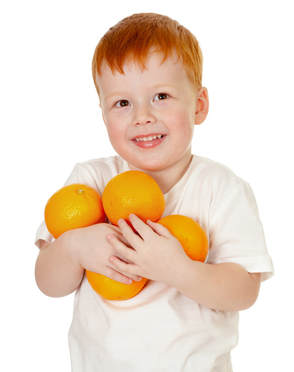 Oranges! Cut an orange in half and scoop out the orange pieces. Cut a small hole in either side of the orange peel and string some twine through either hole. Mix bird seed and corn syrup together. Fill the orange peel with the bird seed and corn syrup mixture. Tie the ends and hang from a branch. Cereal! Cut some strings at different lengths. String some O-cereal onto the string. Tie the ends and hang from a branch. Egg Carton! Tear off the top cover to an egg carton. Cut small holes in each of the four sides and string some twine through the holes. Fill the egg compartments with bird seed. Tie the ends and hang from a branch. Suet! Materials Needed: 1/2 cup lard/bacon fat 1 cup bird seed 1 cup oats 1/2 cup peanut butter (or alternative if allergies are present) 1 cup corn meal 1/2 cup flour Paper or ceramic cup Mesh (if desired) Twine Directions: Melt lard/bacon fat and peanut butter in the microwave for a minute, mix well. Add all other ingredients, mix well. Fill a cup (or two) and cool them in the freezer until they are solid. You can use paper cups and tear them away for a suet cup shape, then place them in a mesh bag and hang it from a tree branch. You can also use a coffee mug and tie twine to the handle and hang it from a tree branch. Nest Makers!Fill an old suet feeder, bird feeder, or wire baskets with dog/cat hair, string, twigs, old fabric scraps, etc. The birds can come by and take what they want for their nests. They can always use any help for those nests! Bird Crafts!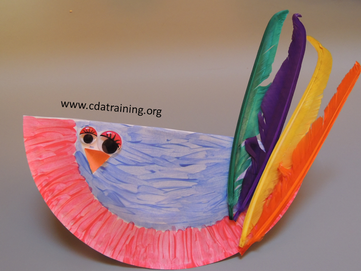 Paper Plate Birds Materials Needed: Paper plates Construction paper Paint or markers Feathers Glue Directions: Provide each child with a paper plate and some decorating materials. Make sure there is enough glue for everyone to share. Encourage children to fold their paper plates in half and decorate them with their own creativity. 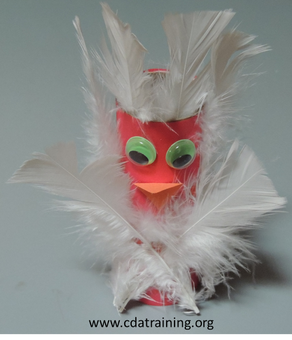 Toilet Paper Roll Bird
Materials Needed: Toilet paper tube (or paper towel tube) Construction paper Glue Feathers Googly eyes Markers Scissors Directions: Provide each child with a tube and some decorating materials. Make sure there is enough glue for everyone to share. Encourage children to decorate their tubes with their own creativity. Do you need some fun spring time activities to do with your children?
 Food Songs!I Like To Eat, Eat, Eat Apples and Bananas I like to eat, eat, eat apples and bananas I like to eat, eat, eat apples and bananas I like to ate, ate, ate ay-ples and ba-nay-nays I like to ate, ate, ate ay-ples and ba-nay-nays I like to eat, eat, eat ee-ples and bee-nee-nees I like to eat, eat, eat ee-ples and bee-nee-nees I like to ite, ite, ite i-ples and bi-ni-nis I like to ite, ite, ite i-ples and bi-ni-nis like to ote, ote, ote oh-ples and bo-no-nos I like to ote, ote, ote oh-ples and bo-no-nos Do You Know The Muffin Man? Oh, do you know the muffin man, The muffin man, the muffin man, Oh, do you know the muffin man, Who lives in Drury Lane? Oh, yes, I know the muffin man, The muffin man, the muffin man, Oh, yes, I know the muffin man, Who lives in Drury Lane. Taste Testing Spring Foods!This is a great game to see if children can figure out what they are eating. It will be super funny to see their guesses and reactions to each food. (I would do this with children two years old or older, so they can verbalize what they think they are tasting.) Spoon different flavors of baby food into individual bowls. (I recommend peas, carrots, and strawberries for spring seasonal foods.) You could have the children take a spoonful of each flavor and place them on a small paper plate or you could do it for them depending on their developmental abilities. Gather the fresh versions of each food or have pictures printed of them. When they taste each food, they can guess which flavor it is based off of the fresh foods or the pictures. Peas and Carrots Sensory Play!Sensory play is so important for all ages! Here is one that uses two spring vegetables. Peas and carrots! 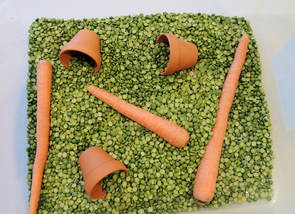 Fill a bucket or sensory bin with some fresh, dry, canned, or frozen peas. They could have shells or already be shelled. Add in some carrots. You could use carrots with the tops still on, baby carrots, frozen, or canned. It's all up to the ages of the children and what you feel you want to clean up later. Just remember, it's fun! Strawberry Playdough!I know everyone has their own best playdough recipe! Here's the one that works best for me!
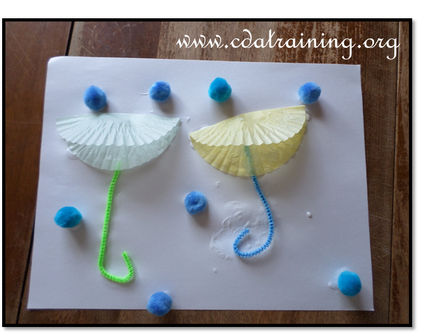
Materials Needed: 2 cups flour 1 cup salt 1 cup hot water 2 tablespoons cooking oil 2 tablespoons cream of tartar 3 oz package of Strawberry Jello Food coloring (if needed) Directions: Mix the flour, salt, and cream of tartar together. Add the hot water and cooking oil to the flour, salt, and cream of tartar mixture. Mix and then kneed it together. Add in the Strawberry Jello and food coloring (if desired). Kneed it again. You can add in poppy seeds to look like the seeds on the outside of the strawberries also! Rain Songs! Rain, Rain, Go Away Rain, rain, go away Come again some other day We want to go outside and play Come again some other day 5 Little Raindrops One little raindrop in the dark, dark sky. Two little raindrops, watch the clouds roll by. Three little raindrops go splat, splat, splat! Four little raindrops, we'll need boots for that! Five little raindrops and still no sun? That's too much for us, we better run! (This is a great fingerplay song that the children will definitely try to repeat every time it's raining!) Puddle Game!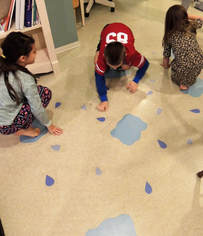 Puddle Jumping Here is a large motor game that can be played inside or outside! The children will be asking to play it again and again! You can write sight words, number, or letters on the "puddles" to make it an all around learning experience. I've played it multiple times and the children love it! It's a great movement game if it's raining outside to burn off some of that energy safely inside! I've used it with older children for learning their upper and lowercase letters and younger children just to practice jumping. Use blue construction paper and cut it into "puddles" Tape them to the floor (close enough for children to jump from one to another) Have the children jump from one puddle to another **You can laminate them to save them for later or cover them on the floor with clear contact paper.* Rain Crafts!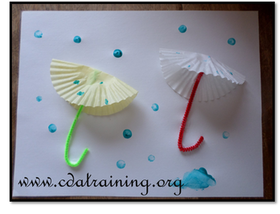 Umbrella Craft Materials Needed: blue construction paper cupcake liners pipe cleaners blue paint glue Directions:
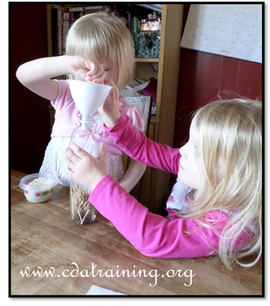
 Alternative to paint raindrops 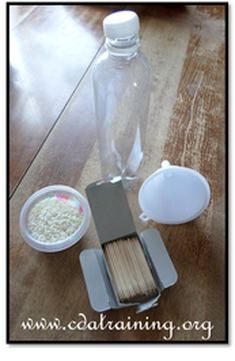 Rain Stick Craft Materials Needed: plastic bottle with a lid (a skinny and tall one works best) lots of toothpicks or wooden skewers small grains (quinoa, barley, rice, etc.) funnel hot glue gun with glue sticks Directions:
Lets bring out that sun with a fun song, game, and activities! Mr. Sun, Sun, Mister Golden Sun Song Oh Mr. Sun Sun, Mister Golden Sun Please shine down on me Oh Mr. Sun Sun, Mister Golden Sun Hiding behind a tree Little children are asking you Please come out so we can play with you Oh Mr. Sun Sun, Mister Golden Sun Please shine down on me Oh Mr. Sun Sun, Mister Golden Sun Please shine down on me Oh Mr. Sun Sun, Mister Golden Sun Hiding behind a tree Little children are asking you Please come out so we can play with you Oh Mr. Sun Sun, Mister Golden Sun Please shine down on me.  Mr. Sun, Sun, Mister Golden Sun Activity A great way to get children moving while singing a song is to make a game out of it. This one is sort of like "Duck, Duck, Goose" with a twist. (This may be best with children preschool age or older, but can be adapted to fit younger age groups if you wanted.)
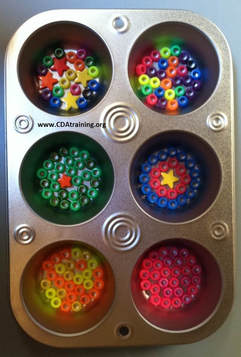
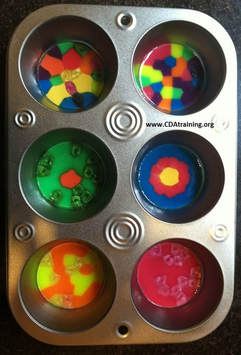
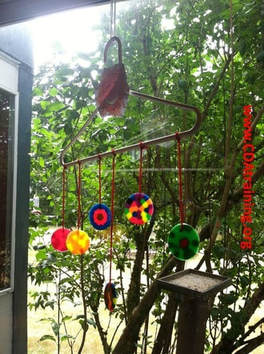 Wind Chime and Sun Catcher Materials Needed: beads muffin pan yarn glue scissors clothes hanger Directions:
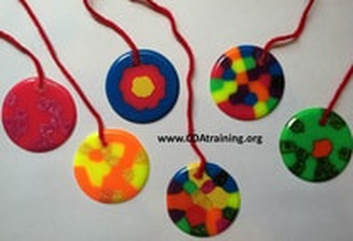 Step 5 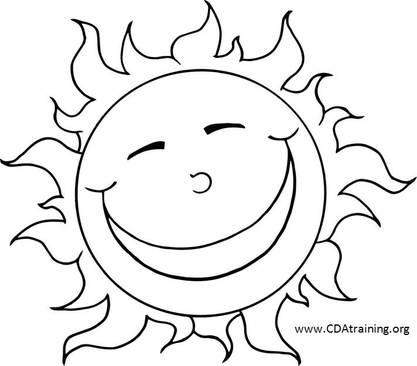 Sun graphic that was used to decorate the clothes hanger 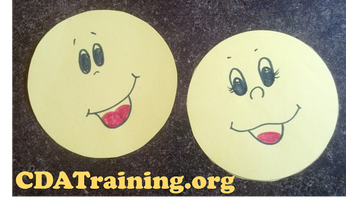 Sunshine Patterns This is a great way to have children practice their patterns and color recognition. You can create a pattern for them to follow or allow them to create their own. A few examples may be: Red, Yellow, Orange Orange, Red, Red, Yellow We tried: Orange, Yellow, Red and Yellow, Red, Orange, Red (pictured below) 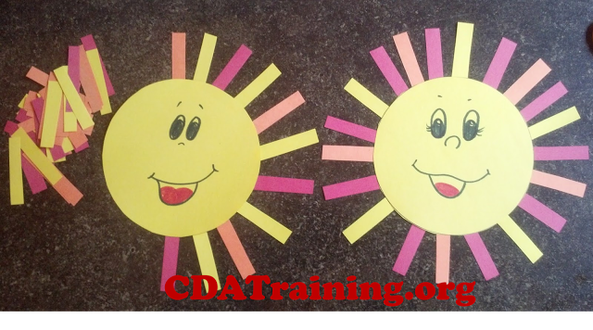 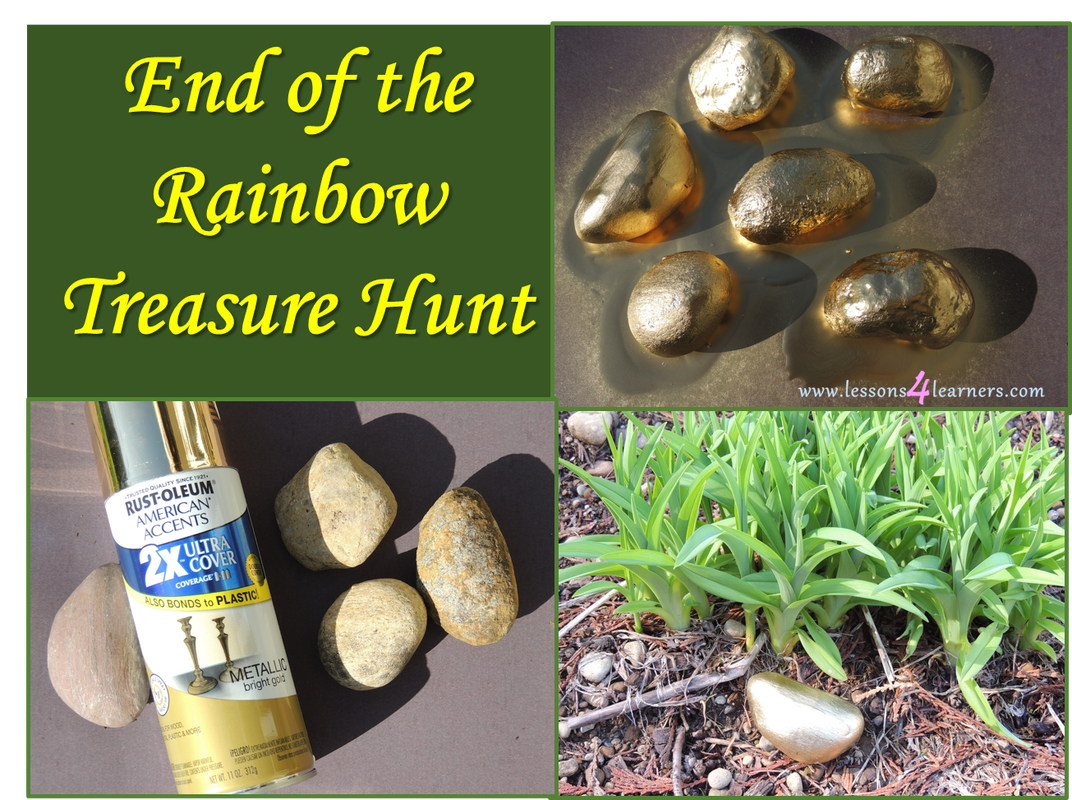
End of the Rainbow Treasure Hunt

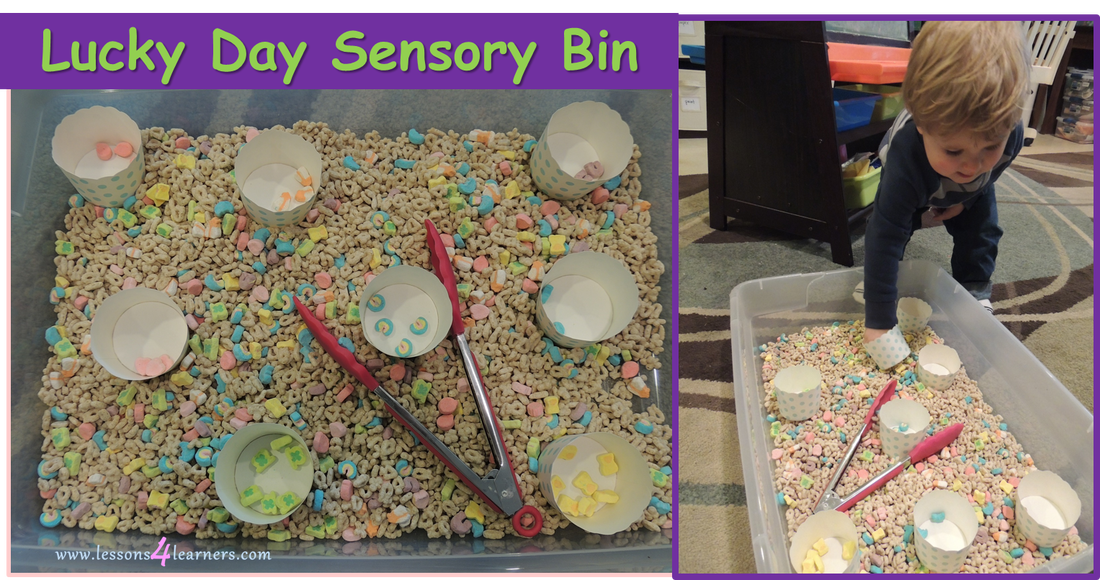
Lucky Day Sensory Bin
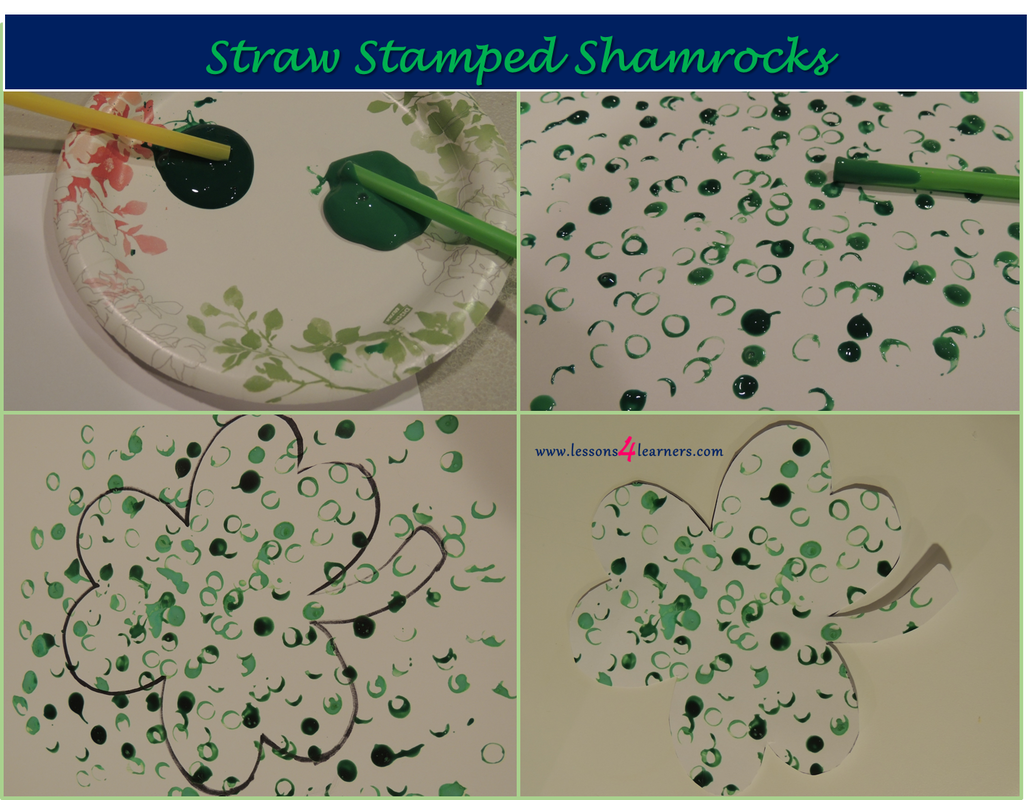
Straw Stamped Shamrocks
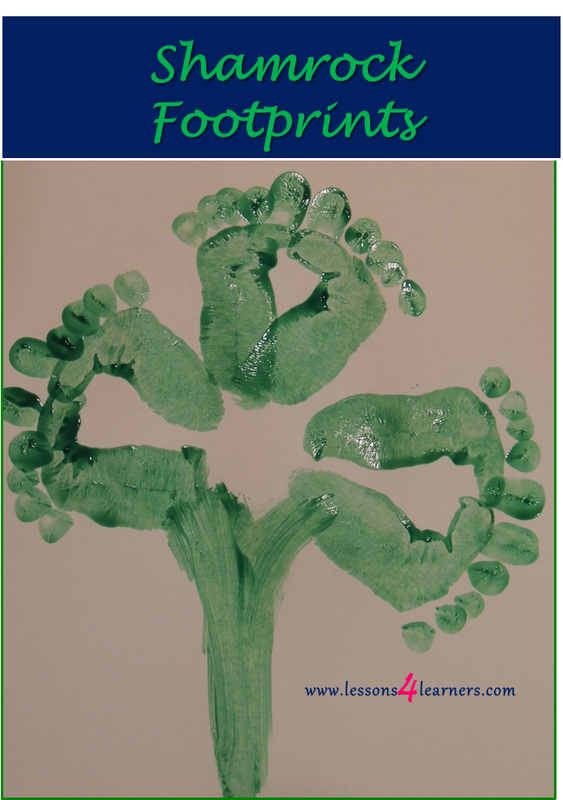
Shamrock Footprints
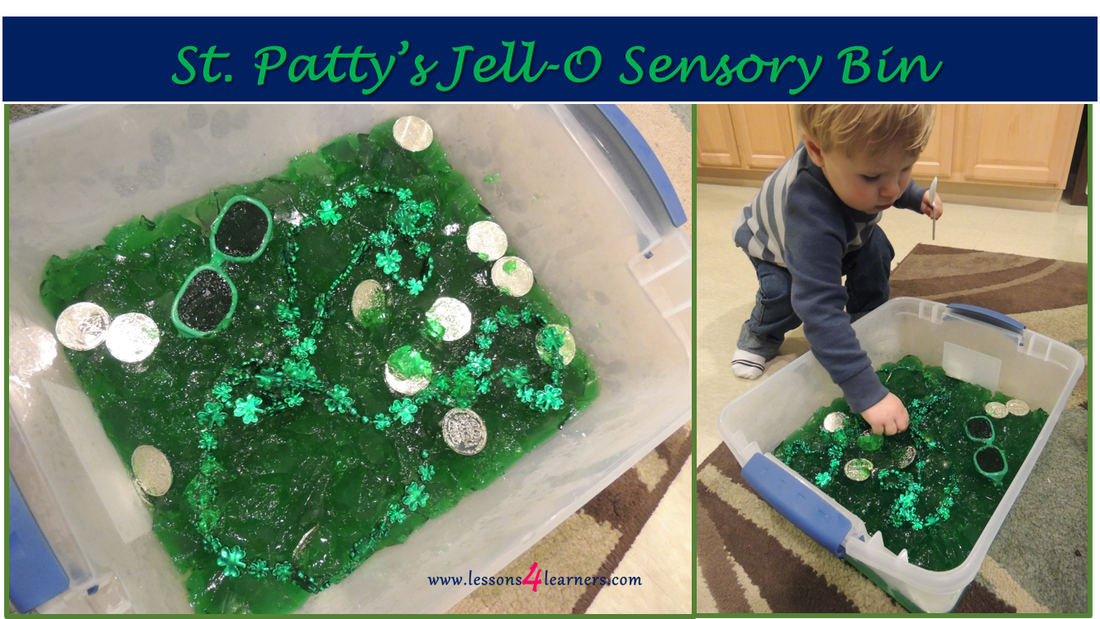
St. Patty’s Jell-O Sensory Bin
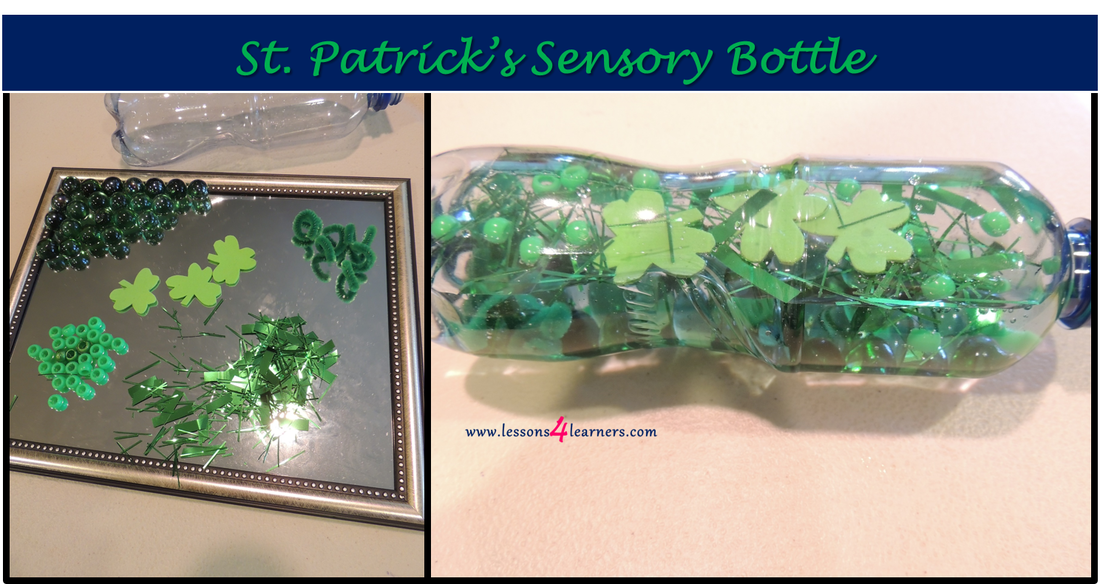
St. Patrick’s Sensory Bottle
Materials:
Procedure:
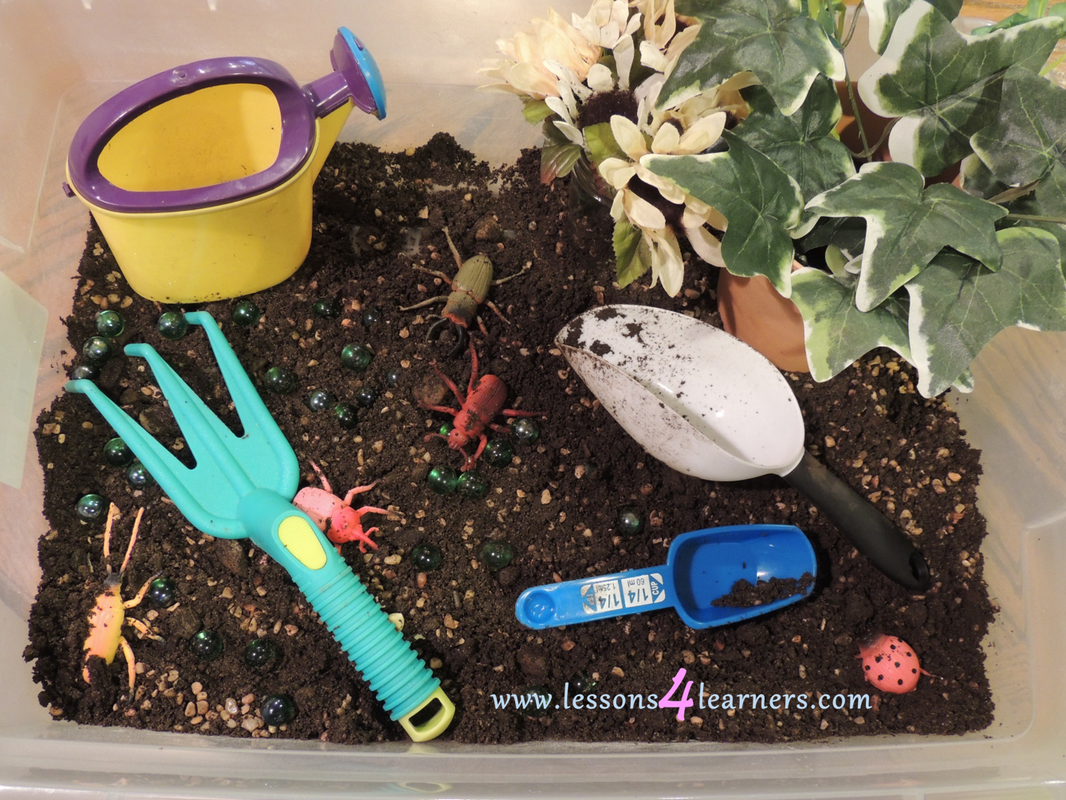
Garden Sensory Bin

Flower Footprints
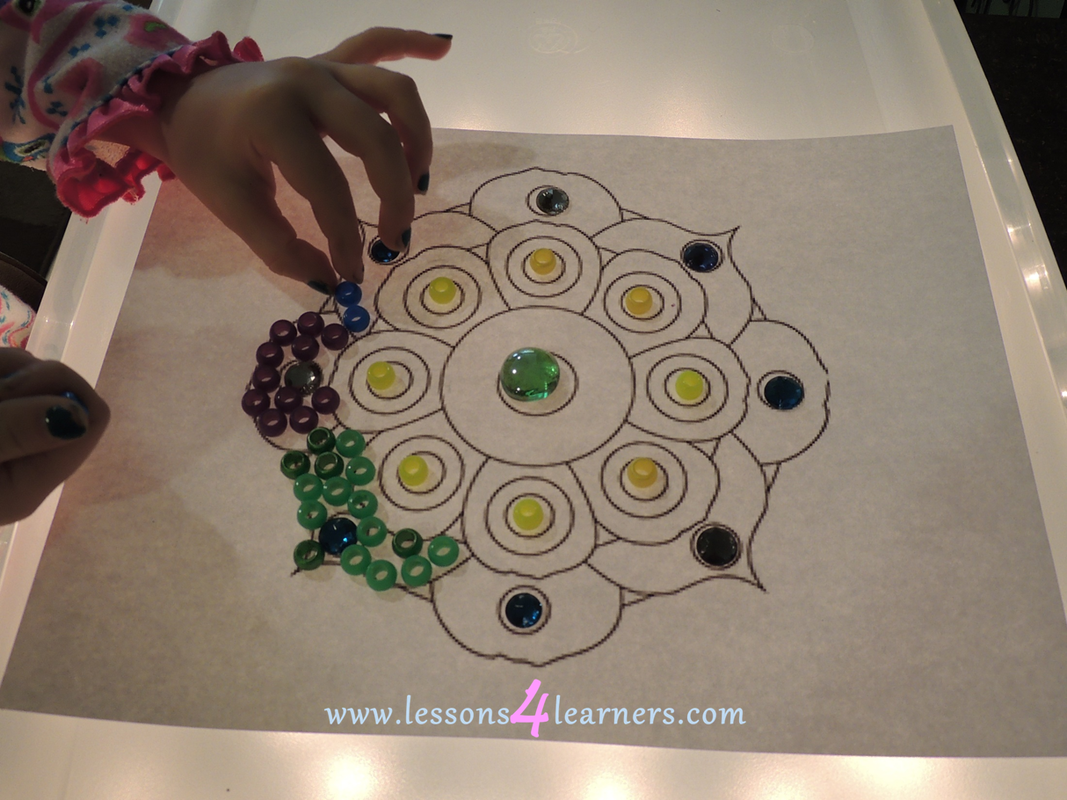
Light Table Mandela Flowers
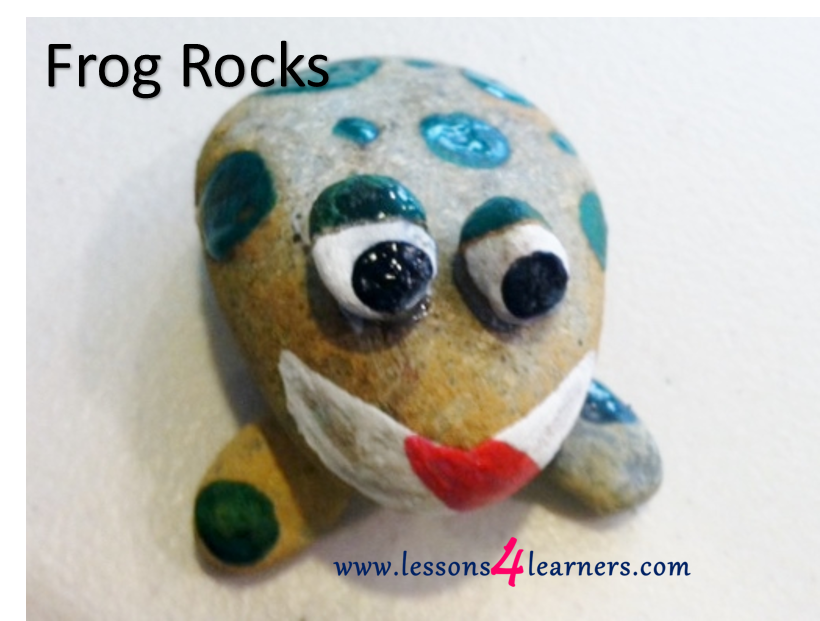
Frog Rocks
If possible, have students collect rocks from outside. They will need one large rock for the body, two medium-sized rocks for the feet, and two small rocks for the eyes. When students are finished collecting, hot glue the rocks together to form a frog -do not allow children to use hot glue gun without supervision. Have students paint their rocks using the various colored paints and paintbrushes.
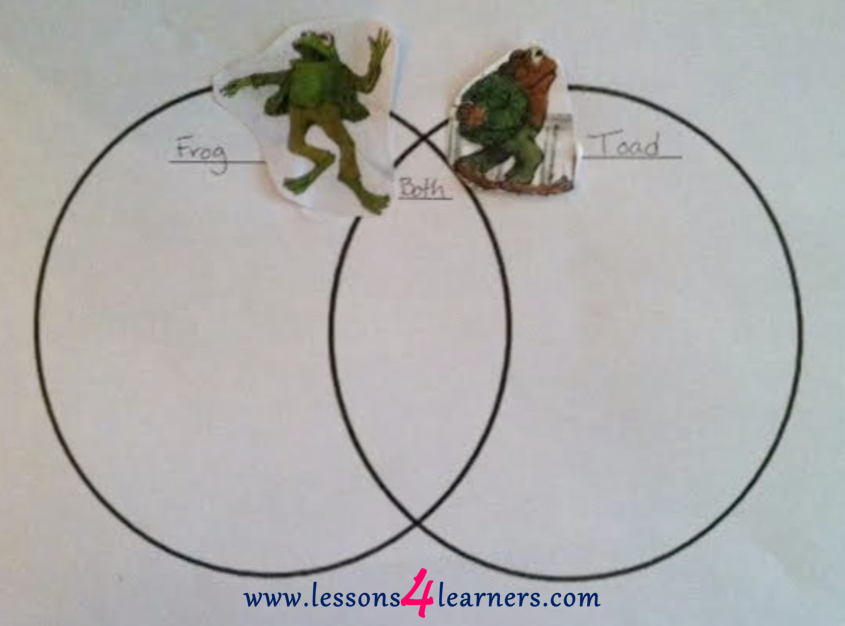
Frog and Toad: Different and Alike
Introduce students to how to use a Venn diagram. Explain that the middle portion is for traits that both characters share, and that each outer portion is for individual character traits. Provide example from characters in another story if possible. Read a chapter from Frog and Toad Are Friends. During the story discuss the actions of each character and what personality trait those actions reflect. Students can then complete their own Venn diagram to compare frog and toad from the story.
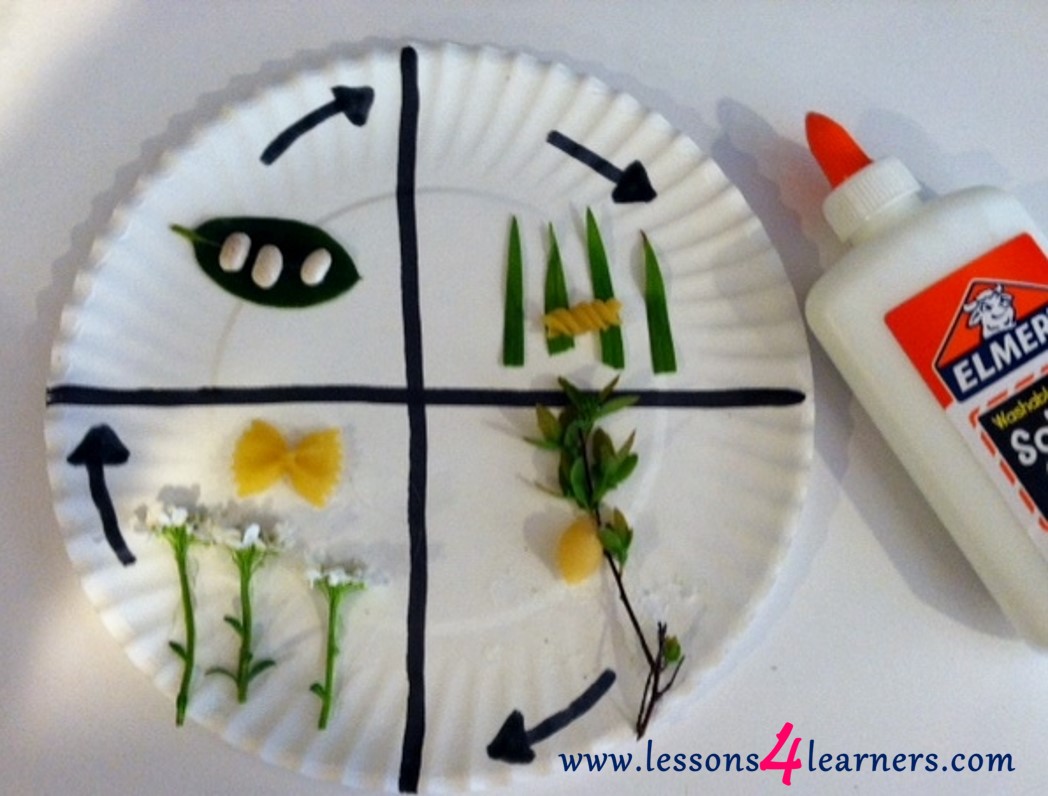
Macaroni Metamorphosis
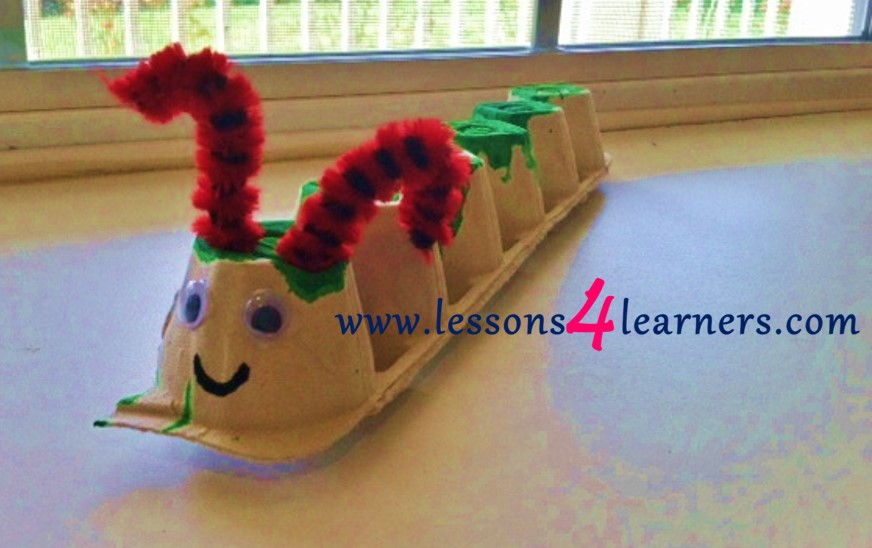
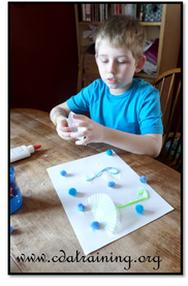
Egg Carton Caterpillar
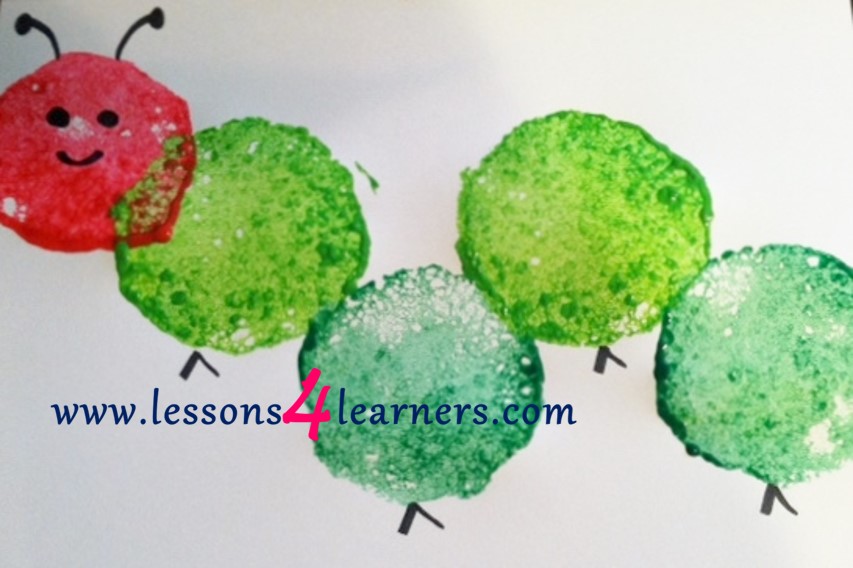
Caterpillar Stamps
Begin by reading The Very Hungry Caterpillar to students. You can ask students questions during/after the reading to check for understanding and encourage conversation about the text. Students can then begin to use the round sponges to create the body and head of their caterpillar. When completed and dry, use the cut pipe cleaners for the antenna and the black marker to make legs and eyes.
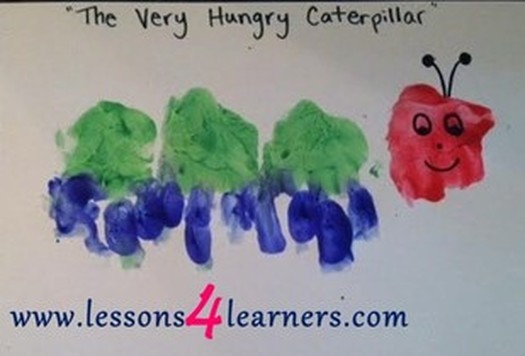
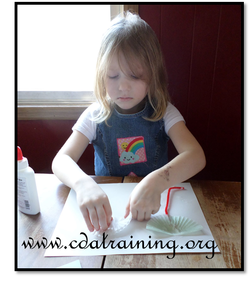
Caterpillar Hands
Sit in a comfortable place such as a rocking chair with the infant on your lap. Hold the book so the infant can see it. Then turn the pages and point out the characteristics of each picture. Initially, use only the first picture, and then talk more about each picture.
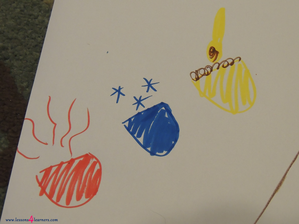
Read the story as you are able, according to the infant's contentment. If the child loses interest, then save the activity and come back to it at another time. When finished, begin the art project. Start by painting the palm of the child’s hand green (this will be the body) and their fingers blue (these will be the legs). Press painted hands onto paper. Repeat 4-5 times for each section of the body. With a clean hand, paint their palm red this time to make the head. Let dry. Use yellow paint and a clean finger to make the outer portion of the eyes. Do this again with green paint and a smaller finger to make the inner portion. Use brown paint and one last clean finger to make antennae.
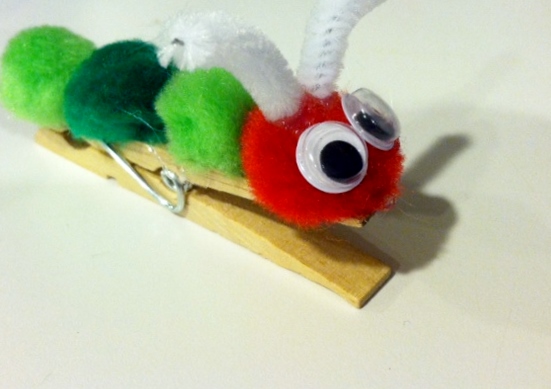
Caterpillar Finger Puppet
Munchy little caterpillar, Crawling oh so slow, Munching up leaves Everywhere you go, So much work, No time to play, How many leaves Will you eat today? (Touch the caterpillar to each leaf as you count numbers 1-5)
Provide the child with cooked pasta noodles and plastic eggs. While the infant is exploring new textures, talk with them about what they are experiencing. You can use new vocabulary words to describe the feeling of the noodles and eggs.
Five Little Ducks Finger Play
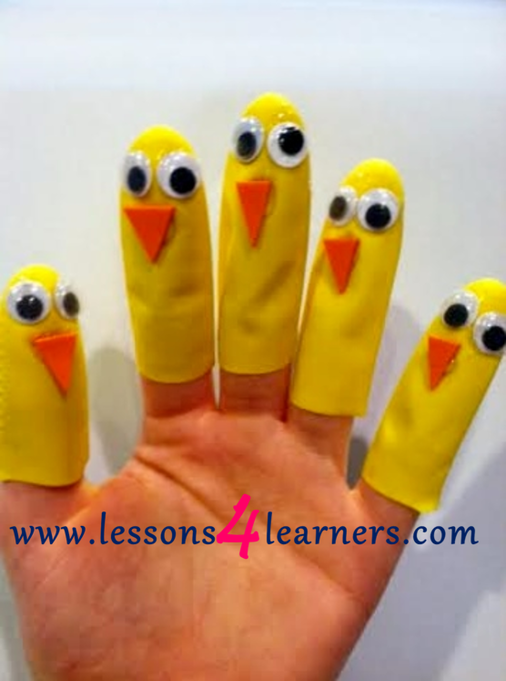
Lesson Prep: To make finger puppets, cut fingers from rubber glove. Glue googely eyes onto puppet. Cut out a small piece of orange foam into the shape of a beak and glue below eyes.
When dry, put on all five duck finger puppets and sing: Five little ducks Went out one day Over the hill and far away Mother duck said "Quack, quack, quack, quack." But only four little ducks came back. Put down a finger and repeat rhyme with one less duck each time. Finish rhyme with: Sad mother duck Went out one day Over the hill and far away The sad mother duck said "Quack, quack, quack." And all of the five little ducks came back”
|